iOS 布局与自动布局
关于AutoLayout的苹果官方教程
Key Points
Layout Process 布局过程
相比于 Frame 布局,Cocoa Auto Layout 除去显示(display)以外,还在之前增加了两个更多的过程:updateConstraintsIfNeeded 和 layoutIfNeeded 。这些过程按顺序进行:更新约束、布局、显示。如果你手动唤起显示,那么显示会唤起布局,布局会唤起更新约束(显示依赖布局,布局依赖约束)。
你可以认为更新约束的传递就像是测量的传递。例如,如果你改变了一个按钮的标题,那么文字会被测量,并且约束会被设置以向布局系统通知信息。
详细过程:
- 更新约束,被称为测量阶段。这个过程自下而上(从子视图到父视图),为下一步的布局做准备。可以调用
setNeedsUpdateConstraints()去触发此步骤,约束发生改变时亦会自动触发。但是当自定义 view 的时候,如果一些改变会影响布局,需要用updateConstraintsIfNeeded()手动通知AutoLayout。自定义 view 通常需要重写updateConstraints方法,在其中添加 view 需要的局部约束。SnapKit 的示例代码中,约束就是在这个方法中添加的。注意⚠️:updateConstraints()方法不应该手动直接调用。 - 布局,自上而下(从父视图到子视图)。应用上一步的信息去设置 view 的 center 和 bounds 。可以通过
setNeedsLayout()方法去触发此步骤,但此方法不会立即触发布局过程。想要立即更新布局,可以调用layoutIfNeeded()方法。自定义的 view 可以重写layoutSubviews()方法获得更多自定义效果。该方法会被layoutIfNeeded()方法自动触发,不要手动直接调用。 - 显示,此过程将 view 渲染到屏幕,此过程与是否使用 AutoLayout 无关,自上而下(父视图到子视图),通过调用
setNeedsDisplay()方法触发。
以上三个过程不是单向的。如果在 layout 的过程中改变了 constraints,那么 update constraints 过程又会被再次触发。如果 layoutSubview() 方法中唤起了另外的布局过程,那么有陷入死循环的风险。
死循环举例:
1 | class myView: UIView { |
Content Hugging Priority & Content Compression Resistance Priority 控件的两个优先级参数
像 ImageView,Label,Button 这样的控件可以根据内容计算出大小。比如 Label 中的文字越多,Label 也就越长。这个大小被称为固有值。如果设置了约束,比如设置 label 的左边距屏幕边界100,右边距边界100,则 label 可能会被拉长。
Content Hugging Priority 表示控件抗拉伸的优先级。数字越大,控件越不容易被拉伸。默认值是251。
Content Compression Resistance Priority 表示控件抗压缩的优先级。数字越大越不容易被压缩。默认值是750。
这里两边的约束都是100,label 本应该被拉长以满足约束的要求。如果把右边的约束优先级修改为10,左边优先级不变,为默认的1000,Content Hugging Priority 为默认的251,高于10。所以优先满足左边的约束和 label 的固有大小,因此右边的约束无效了。
Frame & Alignment Rect 两个不同的矩形
自动布局参照的是 Alignment Rectangle 而不是 Frame。比如一个控件的阴影并不会影响到自动布局。应该牢记在自动布局中,Frame 没有视觉大小重要。
AutoLayout Constraints 自动布局的约束
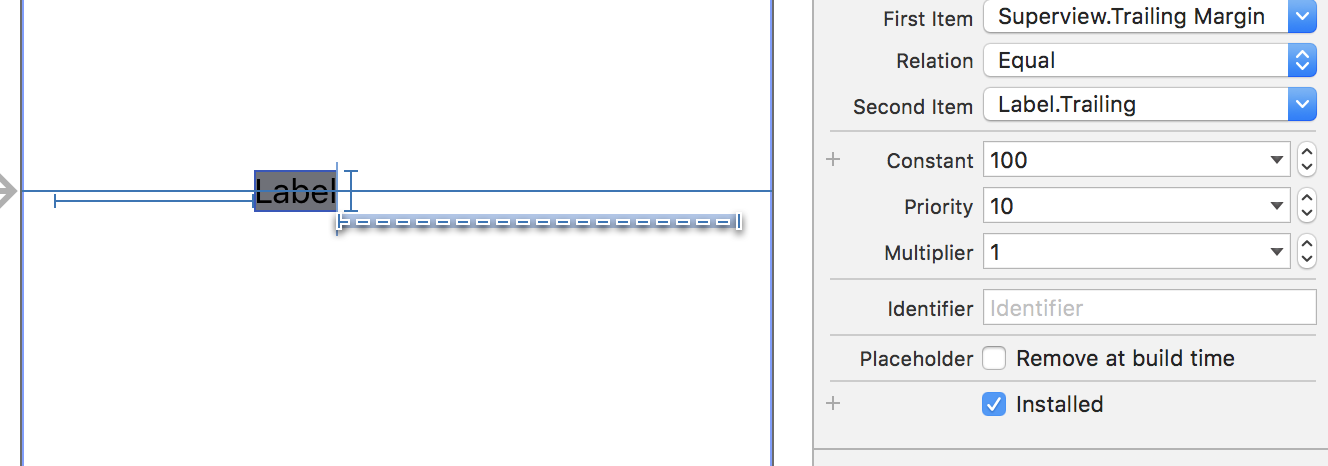
视图的布局体系由一系列线性方程所确定,每个约束都可看作是一个方程的表示。
多数的约束都由两项组成,但是当你设置一个视图的长度、宽度为一个常数时,第二个属性(attribute)会被设为Not An Attribute,比例系数会变成0.0。
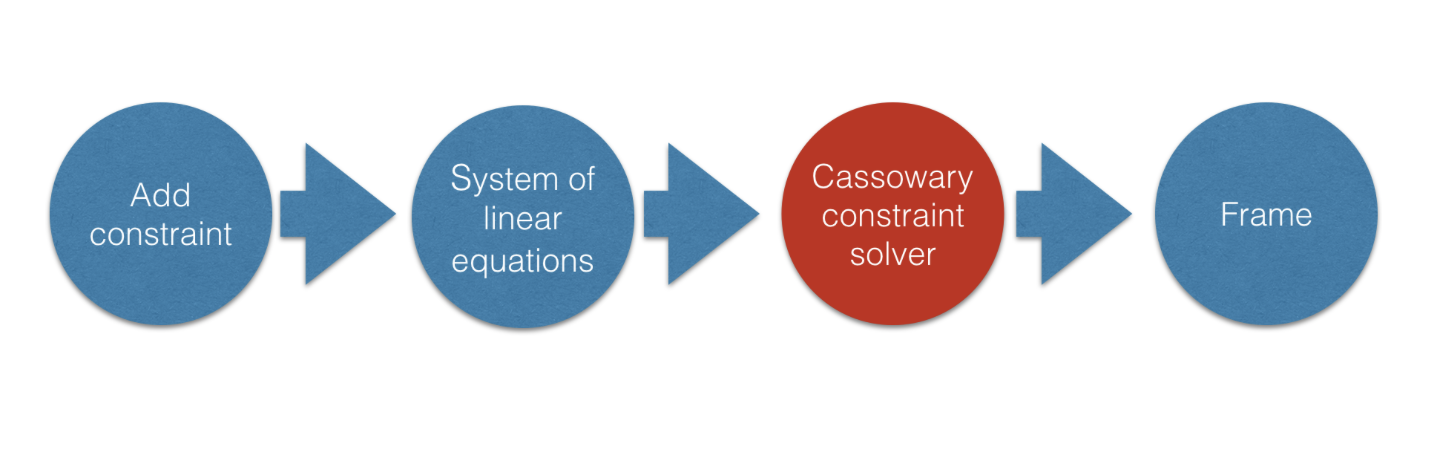
Cassowary 布局算法
Cassowary 是上世纪 90 年代的一个布局算法,它通过将布局问题抽象成线形等式和不等式约束,求解这个多元方程组来算出 x,y,width 和 height。AutoLayout 就是对 Cassowary 的一个实现。
AutoLayout Performance 自动布局的性能
AutoLayout 的性能瓶颈就是 Cassowary 求解多个方程组的效率问题。因此有人建议在 TableView 中不要用 AutoLayout 设置动态高度的 Cell,而是自己手动计算。
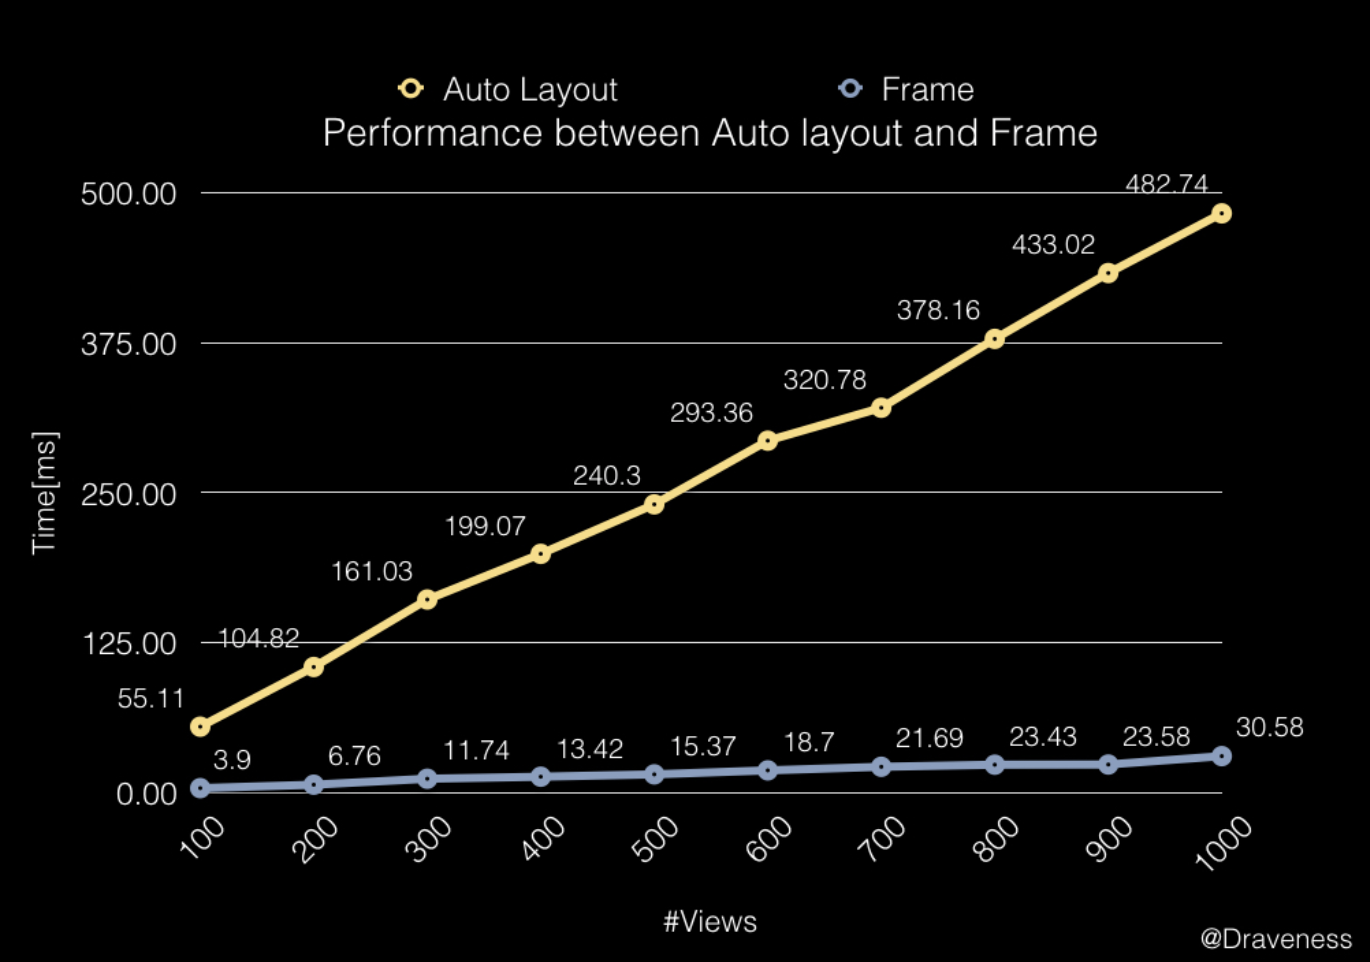
网上有人对 AutoLayout 和 Frame 做了性能对比测试,可见当 view 很多时,AutoLayout 的速度会慢很多。
Masonry & SnapKit 自动布局库
一个简单易用的 AutoLayout 库,可以告别系统自带 api 冗长的代码。Masonry is for Obj-C, SnapKit is for Swift.
GitHub地址:https://github.com/SnapKit
ComponentKit and its layout 视图框架
ComponentKit 是 FaceBook 开源的响应式视图框架,不支持 Swift。
GitHub地址:https://github.com/facebook/componentkit
Constraints Priority 约束优先级
每个约束都有优先级(Priority),范围从1~1000。优先级为1000的约束为必须的(required),其余的为可选的(optional)优先级的绝对大小没有意义,重要的是相对大小。Auto-Layout 会优先满足优先级高的约束。如果一个可选的约束不能被满足,Auto-Layout 会跳过它转而计算下一个约束。
即使可选的约束可能会不被满足,但它依然对布局有影响。系统会选择最接近这个约束的解决方案,不被满足的约束可以看作是一股将视图拉向它的力。
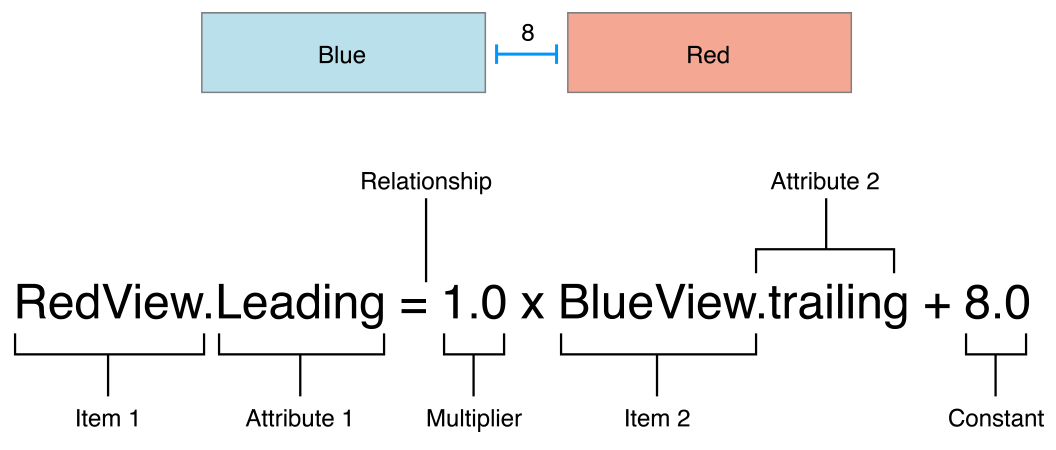
可选的约束经常和不等式配合工作:
1 | // A single equal relationship |
你可以对上面的两个不等式设置不同的优先级。大于等于不等式的优先级可以设为必须的(1000),小于等于可以设置得低一些(250)。这意味着蓝色的视图与红色视图的距离不能小于8,但是其他的约束可能把它拉得更远。当时可选的约束会把蓝色视图拉向红色视图,保证它尽可能地逼近 8 个点的距离。
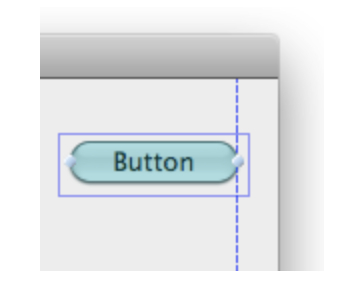
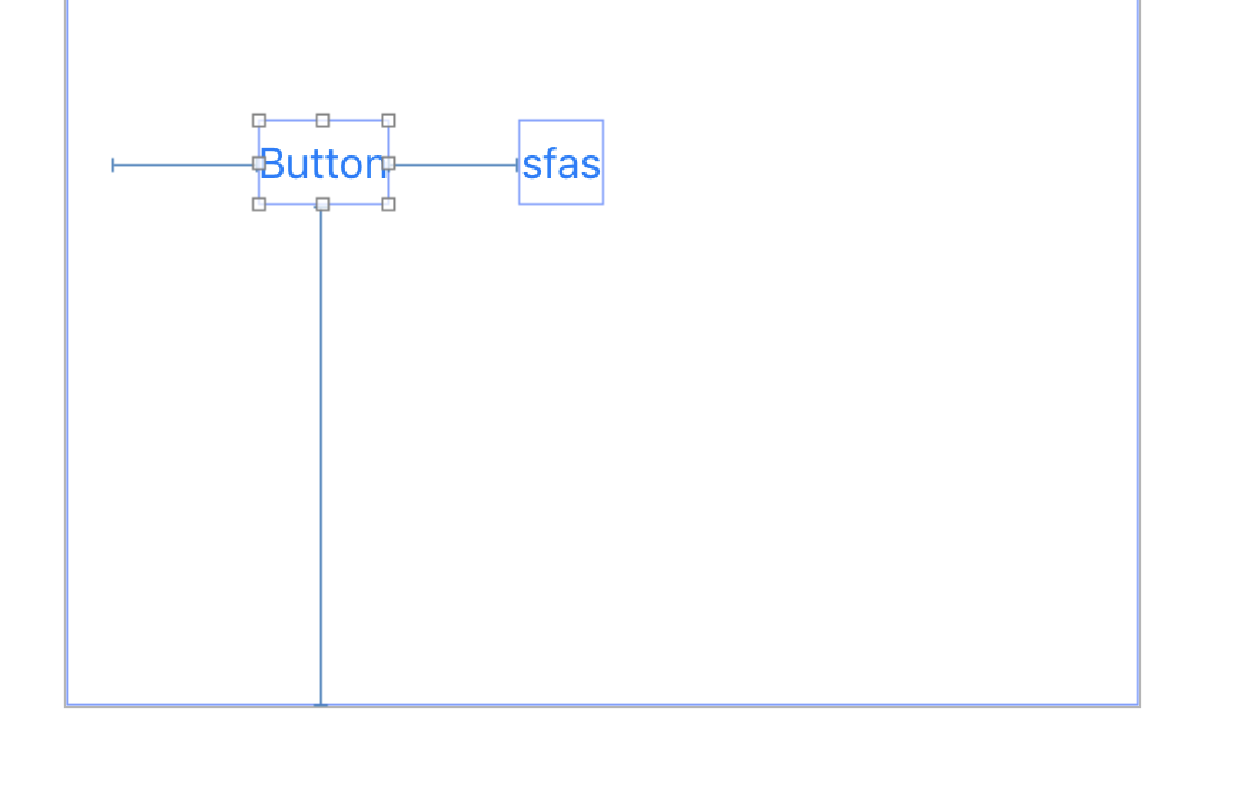
AutoLayout with hidden UIViews layouts 隐藏的视图的自动布局
如果一个 view 被隐藏了,只是试图上看不到了,但是其他的视图距它的约束没有变。如果想让其他的视图跟着变化,可能要修改约束的值,或移除约束,这样代码会过于繁琐。
如下图,如果我们隐藏第一个 Button,第二个 Button 的位置不会改变。而很多情况下我们希望让第二个 Button 位置往左平移,就像第一个按钮真的不存在一样。
Variable row heights (iOS7 & iOS8) 变化的行高
iOS7 和 iOS8 下代理方法调用顺序不同。iOS7 先调用 heightForRowAtIndexPath 方法,后调用 cellForRowAtIndexPath 方法;而 iOS8 与之相反。
AutoLayout in UITableView for dynamic cell 表格视图中动态的 Cell
TableViewCell可以自适应高度,但这个功能不是默认实现的。只有当以下的两个属性被设置后,系统才会使用AutoLayout计算每行的实际高度。
1 | tableView.estimatedRowHeight = 85.0 |
注意:你不能改变预先定义好的部分的布局,如 textLabel , detailTextLabel, imageView。
Questions & Answers
Pros and cons of AutoLayout & Frame Layout 不同布局方式的优缺点分析
UI 布局有以下三种主要方法:
- Frame layout:直接用代码设置每个控件的 Frame。
- 使用 auto-resizing masks:可以自动调整子视图与父视图之间的位置关系。
- 使用 auto-layout。
使用 frame layout 最直接,最灵活。当需要发生变化的时候,所有的改变都有你自己来控制。它带来的问题就是过于繁杂。即使一个很简单的界面,为了适配各种可能的情况,都要花费大量的精力去设计、调试、维持。Frame 的性能高。
使用 auto-resizing masks 可以部分地解决上述问题。但它只是完整的解决方案中的一个子集,无法适应所有可能的情况。而且它只能应对来自外部的改变,如 macOS 中用户调整了窗口大小、iOS中的横屏和分屏。而内部的改变如本地化、app 展示的内容改变这类的问题无法解决。
使用 auto-layout 可以动态地解决内部改变和外部改变。它不直接设置控件的大小和位置,而是通过约束去考虑控件之间的相对关系。功能强大,但可能有点抽象,跟传统的方法不太一致。 AutoLayout 性能低,而且代码冗长蹩脚。
How to get real frame after AutoLayout 自动布局之后怎样获得控件真实的 Frame
在 layoutSubviews() 中对子视图设置约束,首次获取的 frame 不会是自动布局后真实的尺寸,而是一开始默认的值。也就是说在 layoutSubviews() 方法中获取 frame 时,布局还没有完成:
1 | class myView: UIView { |
但是这个方法实际上是多次调用的,在最后一次调用时 frame 就是真实的了。
在 ViewController 中,假设约束是在 viewDidLoad 中设置的,若在 viewDidLoad 中获取 frame,那么 frame 不是真实的。在 viewDidAppear 中获取 frame,是真实的。但是在 viewDidLayoutSubviews() 中获取,仍然不是真实的,这是因为此时 AutoLayout 还没有完成。需要在前面加一句 view.layoutIfNeeded() ,再获取就是真实的了。
Using AutoLayout to create equal width spacing 使用自动布局构建等间距效果
最简单的方法(无需添加约束)就是在 Interface Builder 中创建一个 StackView,并设置它的 spacing 参数。
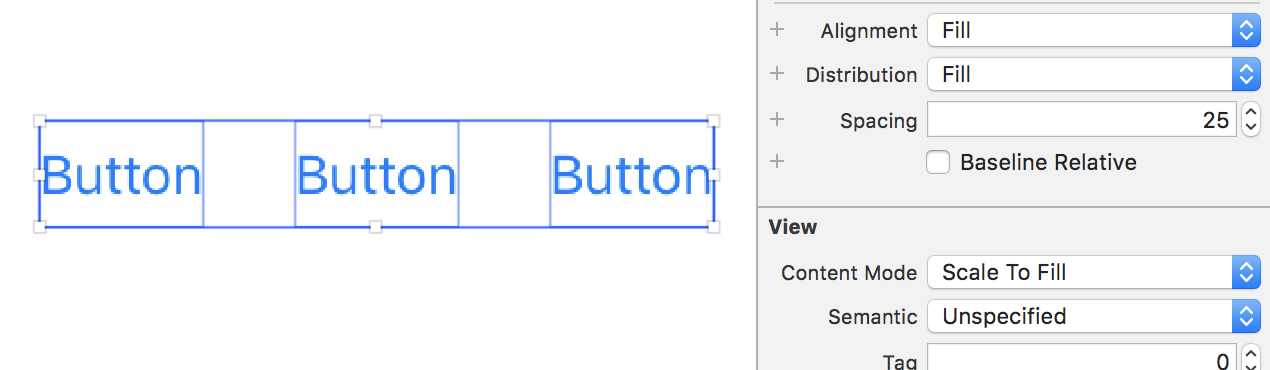
也可以添加约束来实现,设置约束值相同就可以了。当然也可以在代码中设置约束大小相同。
Some reasons for application crash when updating the constraints after removing the views which has some mutual constraints relationship 移除具有共同约束关系的控件后更新约束导致的应用崩溃的一些原因
暂时没有发现应用崩溃。移除约束依赖的视图后,相应的约束也自动被移除了,而使用默认的 Frame 值在屏幕上绘制。